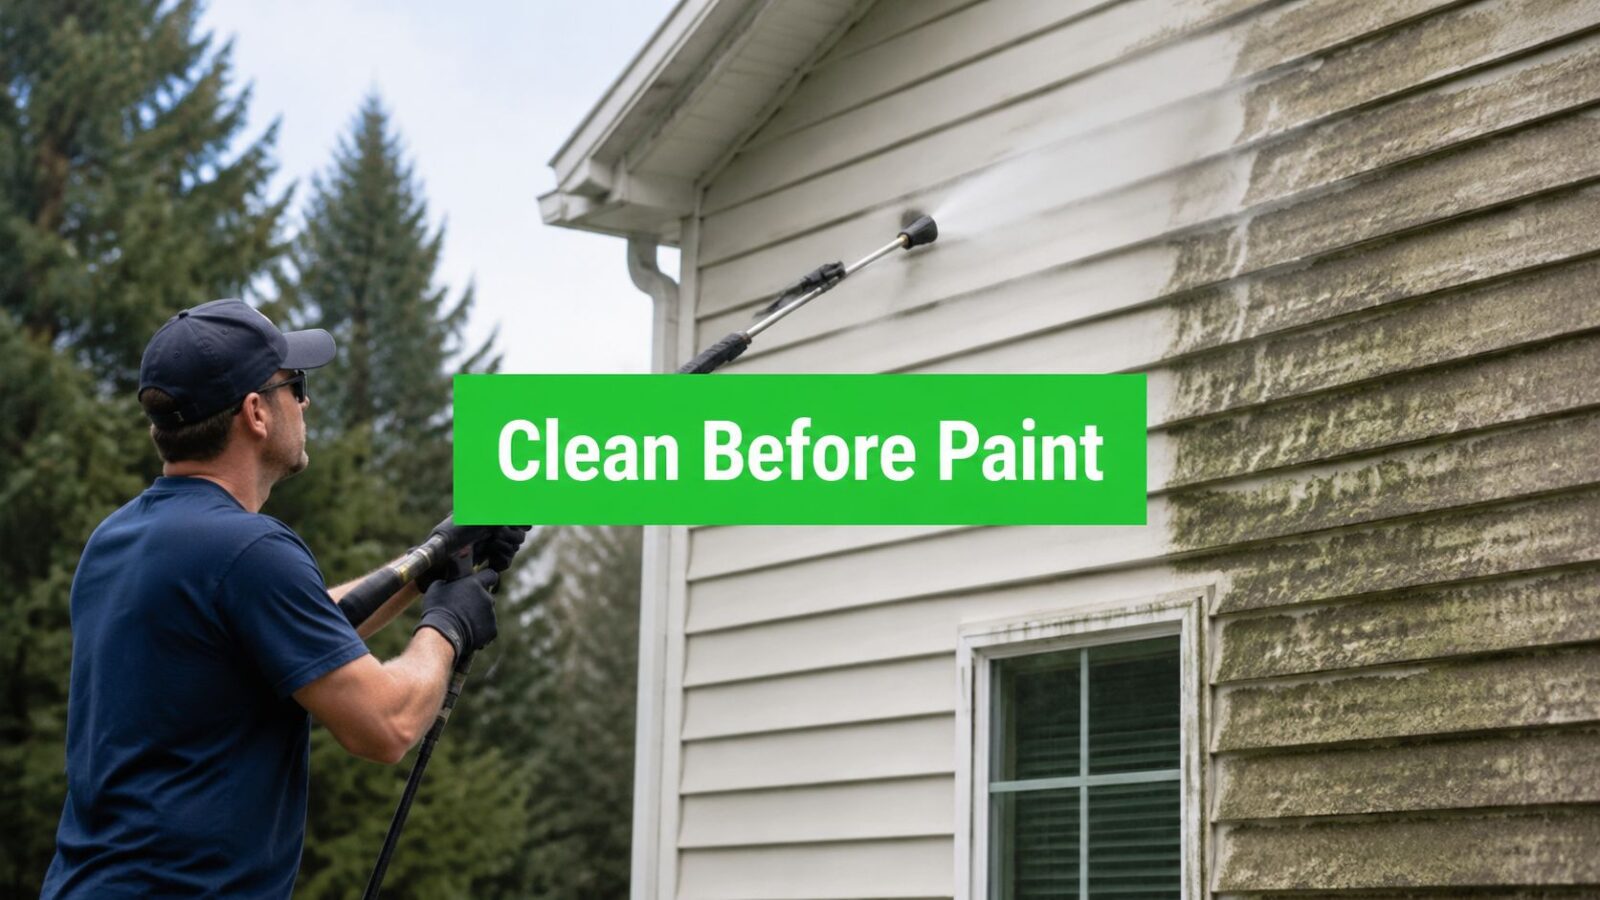
You've picked your paint color, the weather looks decent, and it's tempting to get moving. Most homeowners in Flagstaff and Munds Park hit the same point. The house looks dusty, maybe there's some mildew on the shaded side, and the obvious question is whether pressure washing the house before painting is required.
Sometimes it is. Sometimes it isn't.
That distinction matters a lot in Northern Arizona. High altitude sun, cold nights, freeze-thaw cycles, windblown dust, and older siding on cabins all change how a house should be cleaned before paint goes on. A fast wash done the wrong way can push water behind siding, rough up soft wood, damage caulk, and create problems that don't show up until the new paint starts failing.
Good prep isn't about blasting everything with more pressure. It's about cleaning the surface enough for paint to bond, protecting the home while you do it, and giving the exterior time to dry before any primer or finish coat touches it.
Why Proper Paint Prep Is Non-Negotiable
A fresh paint job only lasts if the surface underneath is ready for it. Dirt is the obvious issue, but it's rarely the only one. Houses in Flagstaff collect fine dust, pollen, soot, oxidation, and residue that can keep paint from bonding evenly. On shaded walls, especially around trees or damp corners, mildew can also be part of the problem.
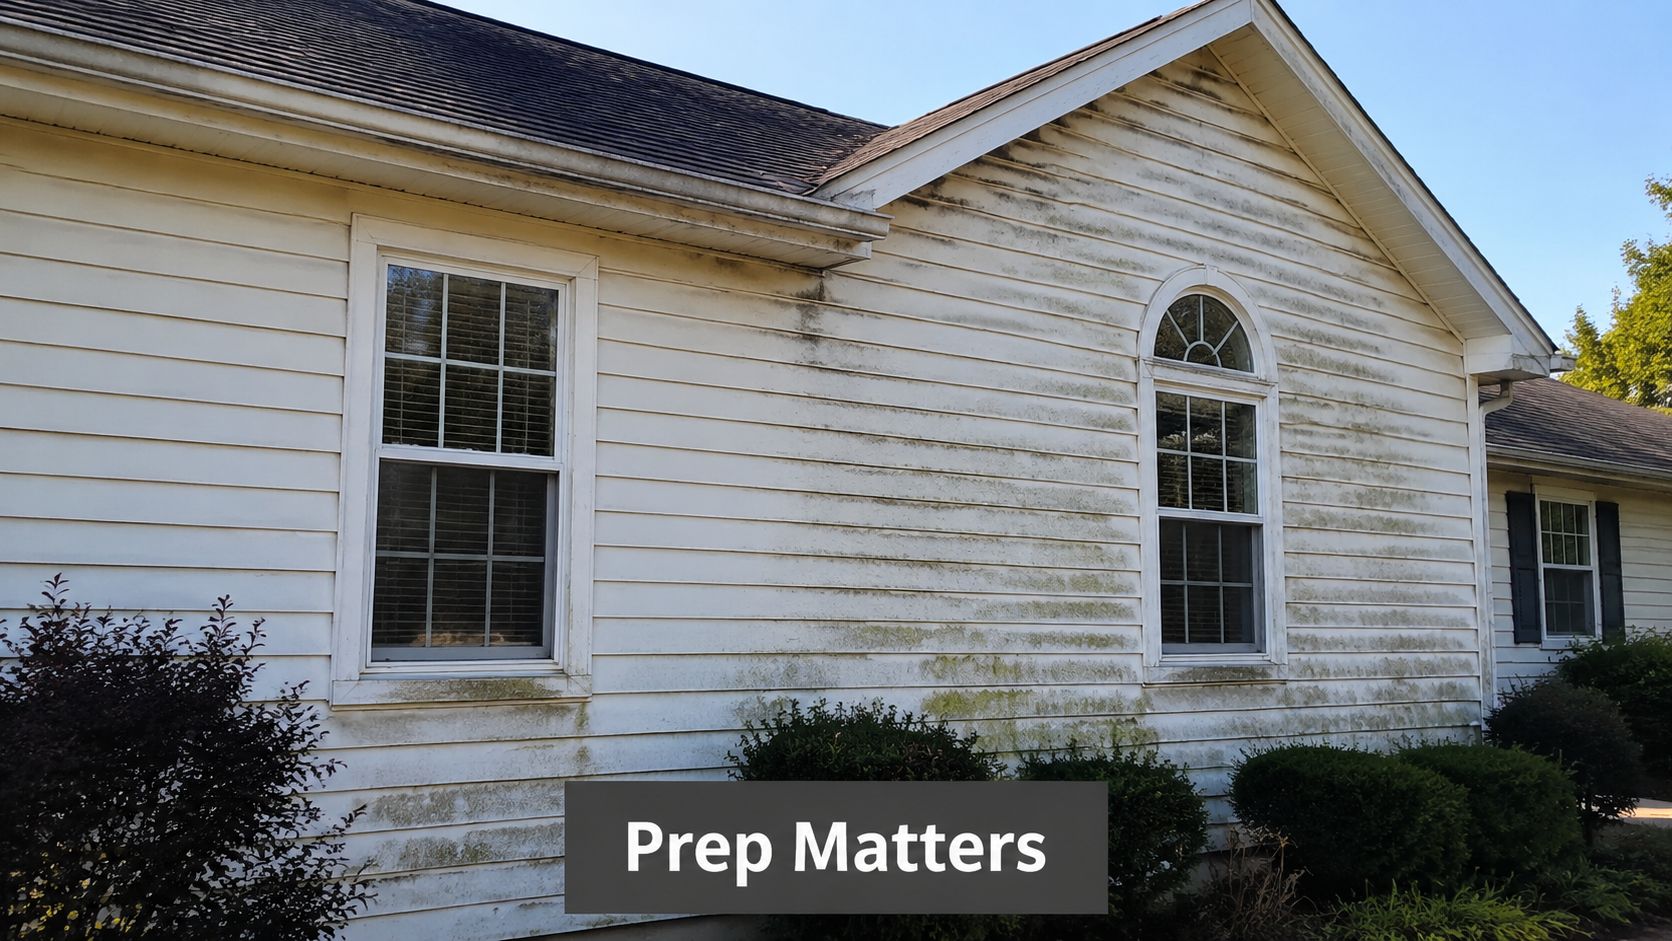
Clean enough for adhesion
The reason to wash a house before painting is simple. You're removing the contaminants that lead to paint failure. That's also why trade guidance has shifted over time. Instead of treating pressure washing as an automatic first step, the better standard is to use it as a surface-specific cleaning step when dirt, mildew, or oxidation are present. Fine Homebuilding makes the point clearly. Pressure washers are for washing, not stripping paint, and one contributor notes using a 3-to-1 water-to-bleach solution when mildew is present before washing in Fine Homebuilding's pressure washing guidance.
That lines up with what works in the field. If the house is dirty, clean it. If there's mildew, treat it. If paint is loose, scrape it. If the surface is sound but dusty, full-force washing may not be the smartest move.
Practical rule: The goal is not to make the house look wet and bright for a day. The goal is to give the new coating a stable, contaminant-free surface.
Northern Arizona makes shortcuts expensive
Flagstaff homes take a beating from sun exposure and seasonal moisture swings. Paint expands, contracts, and ages hard here. If you paint over chalking, grime, or biological growth, the finish can look uneven fast. If you force water into trim joints or behind aging siding, freeze-thaw weather can make that mistake worse.
That's why prep should be handled as part of caring for the whole exterior, not just the paintable wall. Windows, screens, trim, fixtures, landscaping, and seals all need attention during wash prep. That whole-home mindset is also reflected in practical resources like Newline Painting exterior house tips, which reinforce that exterior painting success starts long before the first coat goes on.
Choosing the Right Tools and Detergents
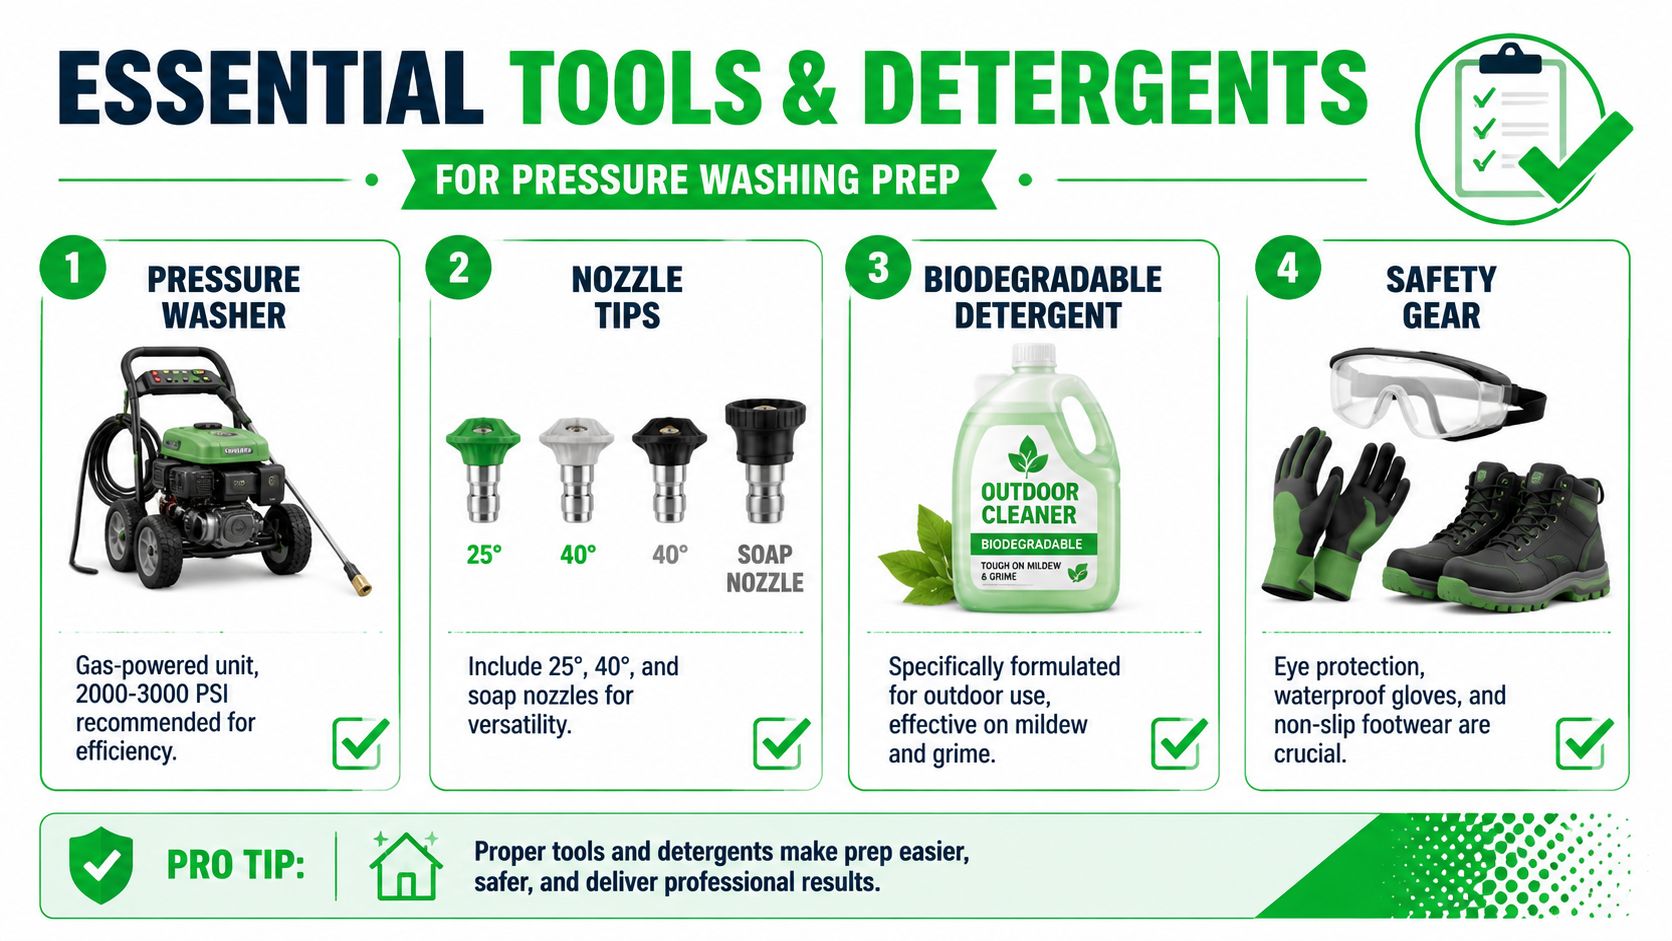
The right setup makes house washing safer and more controlled. The wrong setup turns it into guesswork. For most full-house cleaning jobs, a small consumer machine often struggles to rinse thoroughly and consistently, especially on taller walls or larger homes.
Equipment that actually fits the job
For house washing, one expert source recommends a gas-powered washer generating at least 2,000 PSI, preferably 2,500 PSI, paired with 50 ft of high-quality garden hose, plus a detergent or bleach mix to kill mold spores and mildew before rinsing in this expert house washing video. That same source also stresses technique over brute force. Use a larger-orifice tip and keep the spray directed downward so you don't drive water into the wall assembly.
A few basics matter more than people think:
- Pressure washer type: Gas-powered units usually give steadier cleaning power for larger exteriors.
- Nozzle choice: Wider spray patterns are safer on siding than tight, aggressive tips.
- Hose quality: A better hose helps maintain flow and reduces frustration on long runs around the house.
- Extension tools: Wands and poles can help reach areas without unsafe ladder moves.
If you want a simple breakdown of terminology first, this guide on power washing vs pressure washing helps clarify what each method is doing.
Detergents matter more than most DIY guides admit
Water alone removes loose dirt. It does a much poorer job on mildew, oily residue, and stuck-on grime. On homes tucked into pines or exposed to long shaded periods, that biological growth often needs chemistry to break it down before rinsing.
Use products made for exterior surfaces. Avoid random household mixes unless you know exactly how they'll react with paint, plants, and surrounding materials. The detergent should match the problem:
- General dirt and dust: A siding-safe exterior detergent is usually enough.
- Mildew-prone sections: Use a cleaner intended to treat organic growth before rinsing.
- Heavy buildup under eaves or near downspouts: Let the detergent dwell, then rinse thoroughly.
Later in the wash process, it helps to have visual guidance on technique. This walkthrough is worth watching before anyone starts squeezing the trigger.
Don't forget the parts of the home you're not painting
A painter may be focused on siding. A good exterior cleaning crew pays attention to more than siding. Screens, glass, trim, stained wood, light fixtures, and vulnerable seals all sit in the splash zone during washing.
Pine Country Window Cleaning handles exterior cleaning work that often overlaps with paint prep, especially when homeowners want the siding cleaned without neglecting windows, screens, and surrounding surfaces. That matters on homes where one rushed wash can leave grit in tracks, dirty runoff on glass, or water where it doesn't belong.
Your Step-by-Step House Washing Guide
A Flagstaff house can look dry, solid, and ready for washing until the first pass sends water into cracked trim, behind curled siding edges, or onto sun-brittle seals. That is why the setup matters as much as the rinse. In Northern Arizona, high altitude, strong UV, and freeze-thaw wear turn small exterior weaknesses into entry points fast.
Prep the site before any spraying starts
Start with a full walkaround from foundation to eaves. Check for loose boards, failed caulk, open joints, damaged screens, exposed sheathing, soft fascia, and paint that is already lifting. On older wood-sided homes, cabins, and houses with a lot of trim detail, that inspection often tells you to reduce pressure, change detergents, or skip high-pressure washing on certain walls.
Then set the house up so runoff and overspray do not create a second problem.
- Wet down plants first: Dry landscaping absorbs cleaner faster. Pre-rinsing helps protect roots and leaves.
- Close and check openings: Older windows and doors in Flagstaff often have dried gaskets or slight gaps from seasonal movement.
- Watch electrical and fixture penetrations: Exterior lights, outlets, cable entries, and meter areas should stay out of the direct spray path.
- Clear the work path: Move furniture, grills, planters, and hoses into positions that let you work without dragging dirt across glass, screens, or stucco.
Window areas deserve extra attention. Screens trap grit. Frames hold runoff. If the house is being prepped for paint, a careful crew removes screens, washes them separately, and keeps dirty water out of tracks and weep systems. That whole-exterior mindset is part of good prep, whether the work is handled by a painter, an exterior cleaning crew, or a company like Pine Country Window Cleaning that regularly deals with the overlap between siding, windows, screens, and trim.
Use technique that fits the surface
Apply cleaner in sections you can control. Let it dwell long enough to loosen buildup, then rinse before it dries on the wall. In Flagstaff's sun, that window can be short on south- and west-facing sides.
Spray angle and distance matter more than raw force. The Painting Contractors Association's surface prep guidance supports using methods that clean the substrate without driving water into the assembly or damaging the surface. Start with a wider fan tip, keep your distance, and lower the pressure until you find the point where the wall cleans without scarring paint, wood, or stucco.
A few field rules prevent a lot of damage:
- Start farther back than feels necessary.
- Keep the wand moving.
- Rinse with the siding profile, not up into laps and seams.
- Test a small area before committing to a full elevation.
- Stop if paint starts shredding or water begins disappearing behind the cladding.
Homeowners looking into local power washing for homes should ask how the crew adjusts technique for older materials, shaded walls, and window-heavy elevations, not just what machine they use.
Match the wash to the siding
Different materials react differently under pressure, especially after years of sun exposure and winter cycling.
| Siding Material | Recommended PSI Range | Nozzle Tip |
|---|---|---|
| Vinyl siding | 1,500–1,800 PSI | 25° or 40° |
| Painted wood siding | 1,500–1,800 PSI | 25° |
| Stucco | 1,500–1,800 PSI | 40° or soap tip |
| Fiber cement | 1,500–1,800 PSI | 25° or 40° |
Those ranges are starting points, not automatic settings. Vinyl can flex and let water behind the panels. Painted wood can fuzz or strip if the stream is too tight. Stucco is the one that catches people off guard in Northern Arizona. Hairline cracks, old patches, and dry, brittle areas can open up under aggressive rinsing. Fiber cement holds up well, but joints, edges, and factory finishes still need a controlled wash.
Know when to stop washing and switch tasks
Washing removes dirt, chalk, cobwebs, and loose contamination. It does not finish the prep by itself. If the rinse exposes failing paint, open seams, rotten trim, or damaged caulk, stop and handle the repair before anyone talks about primer.
That is also where experience shows. Around windows, corner boards, light fixtures, and trim transitions, the goal is a clean surface that is still intact. A rushed operator can force water where it should never go, and in a climate with freezing nights and hard summer sun, that mistake tends to show up later as peeling paint, stained trim, failed seals, or cracked caulk.
The Drying and Inspection Phase
A wall can look ready by noon and still be holding water in the joints, trim, and shaded laps. In Flagstaff, that happens all the time. High altitude sun dries the surface fast, but north sides, deep eaves, and cool overnight temperatures keep moisture trapped longer than people expect.
Paint does not care how dry the wall feels to your hand. It cares whether moisture is still in the material. If you coat over damp siding, trim, or patchwork repairs, adhesion suffers and the finish often fails early.
Drying takes patience, not guesswork
A common benchmark is to wait until the surface is dry enough to paint, often verified with a moisture meter, and some homes need several days after washing before they are ready, especially where shade and weather slow the process, as discussed in this painting prep moisture video. Excess moisture can interfere with adhesion.
Northern Arizona adds a few wrinkles. Strong sun and thin air help with surface drying. Freeze-thaw cycling, afternoon storms, monsoon humidity, and cold nighttime temperatures can stretch out the drying window or make it uneven across the house. One elevation may be ready while another still needs time.
This is also where whole-exterior care matters. Water can sit around window trim, behind loose siding edges, under deck ledgers, and in cracked caulk lines. Those areas affect more than paint. They affect the condition of the home itself. Homeowners looking at broader exterior care can see that approach in this overview of house washing and exterior cleaning services.
If the schedule is tight, reduce the amount of water you introduce. A targeted wash on dirty or peeling sections is often the better call than soaking every wall just to say the whole house was pressure washed.
Inspect what the wash exposed
Once the siding is fully dry, walk the property slowly. Look at the paintable surfaces, then keep going. Check the trim, sealant lines, fixtures, vents, window edges, and other transition points where water intrusion usually starts.
Focus on these problem areas:
- Residual dirt: Eaves, corners, and trim transitions often need hand cleaning after the main wash.
- Chalky residue: If oxidation still wipes off on your hand, the surface needs more prep before primer.
- Loose or lifted paint: Scrape and feather those edges now, before they telegraph through the new coating.
- Failed caulk or sealant: Check around windows, penetrations, butt joints, and trim connections.
- Material damage: Soft wood, cracked stucco patches, swollen trim, and open seams need repair before paint goes on.
For homeowners comparing service options, this guide to local power washing for homes is useful because it treats cleaning as part of exterior upkeep, not just a quick cosmetic step.
Soft Washing and When to Avoid High Pressure
You wash a south-facing wall in Flagstaff at midday, and it looks dry fast. That does not mean the assembly is ready for force. High-altitude sun can dry the surface skin quickly while water still sits in cracks, trim joints, and behind failing paint. Add freeze-thaw wear, brittle caulk, and years of UV exposure, and a hard rinse can turn prep into repair.
High pressure is a tool, not a default method. On a newer, sound exterior, moderate pressure can remove loose dirt and chalk. On older wood siding, sun-baked trim, checked logs, cracked stucco, or paint that has already lost its bond, the safer choice is often soft washing with the right cleaner and a controlled rinse.
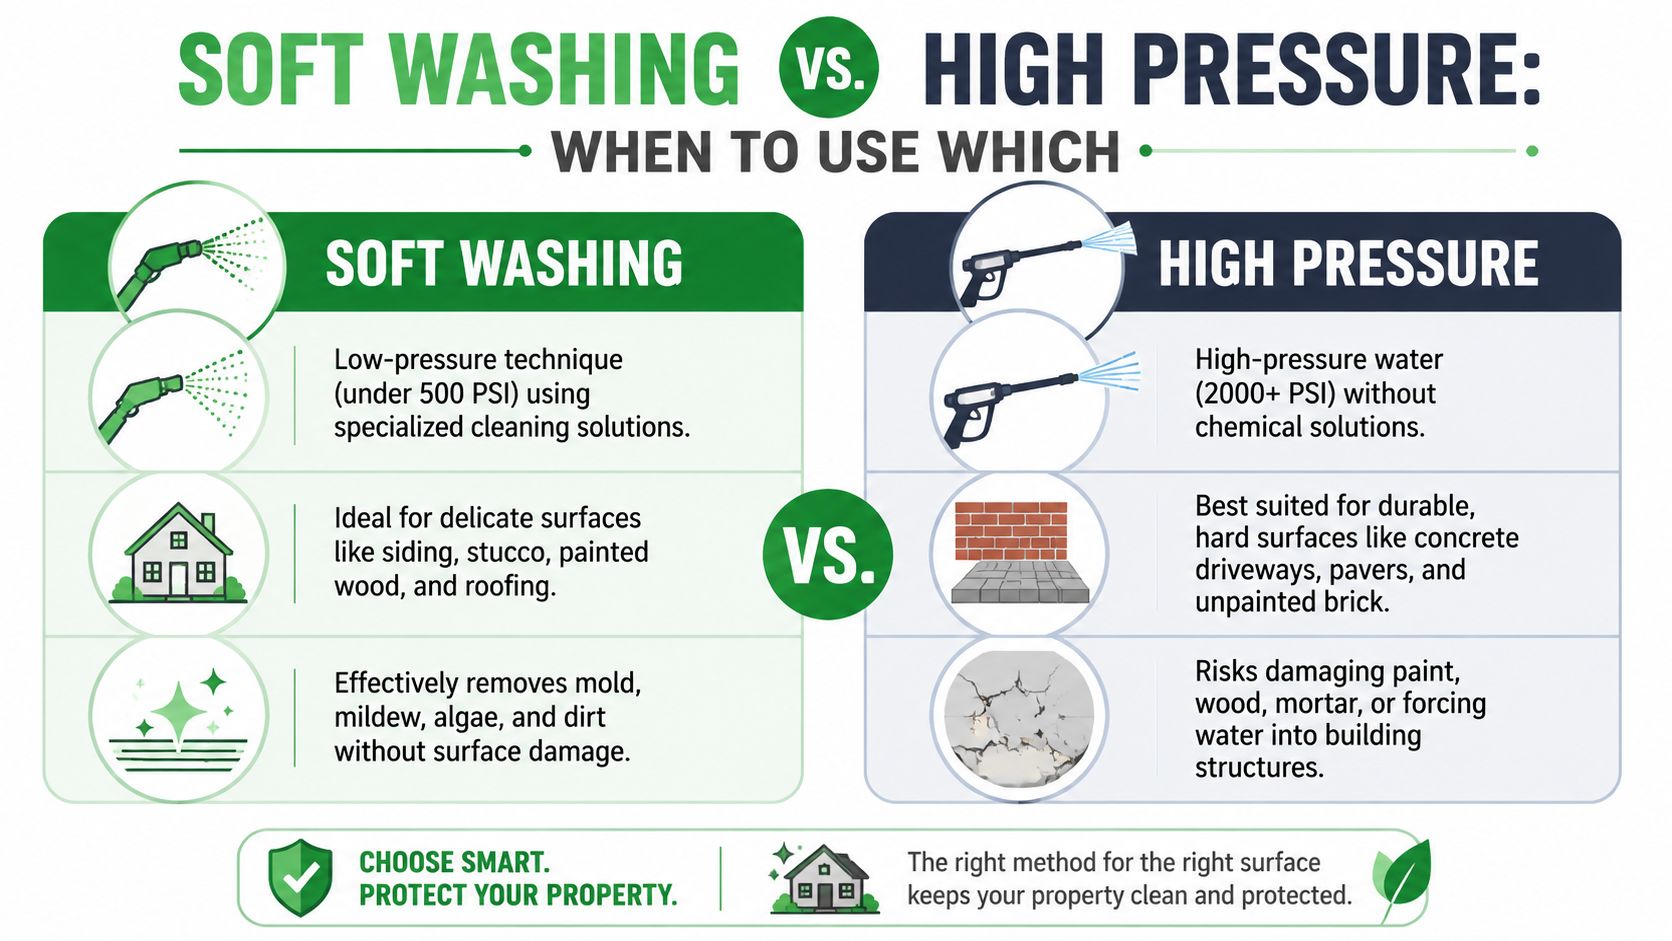
Soft washing works best when contamination is the primary problem. Mildew, organic staining, cobweb residue, and general grime usually respond better to dwell time and chemistry than to impact. That matters in Northern Arizona, where homes often have a mix of materials and exposure conditions on the same structure. One wall may be baked by sun, while another stays cooler under trees and holds moisture longer.
Use caution or switch to a gentler process in these situations:
- Aged caulk and open seams: Pressurized water can get behind siding and trim.
- Historic or delicate wood: The surface can fur up, gouge, or lose more paint than intended.
- Stucco with hairline cracking: Water entry matters more than getting every stain off in one pass.
- Previously patched areas: Weak repairs can break loose under force.
- Windows, vents, and trim transitions: These are common failure points if the operator chases dirt with too much pressure.
A good prep plan protects the whole exterior, not just the areas getting paint. That includes window frames, screens, light fixtures, soffits, sealant joints, and any place rinse water can collect or get pushed inward. Homeowners comparing methods can see that broader exterior-care approach in these pressure washing services for Flagstaff-area homes.
The right wash removes contamination without driving water into the building envelope or damaging materials that still need to hold paint.
Why Hiring a Flagstaff Professional Makes Sense
Pressure washing a house before painting sounds straightforward until you're the one balancing hose management, ladder safety, chemical handling, siding type, window protection, drying time, and weather shifts. That's where professional work starts to make sense.
Local judgment matters
Flagstaff isn't Phoenix. The climate changes the job. High-elevation sun can dry one wall quickly while another side of the house stays cool and damp. Winter wear can open seams you won't notice until rinse water shows up where it shouldn't. Homes in the pines also collect different debris and biological growth than houses in more open neighborhoods.
A local crew should know how to read those conditions before the first pass on the siding. That means deciding whether the house needs full washing, spot treatment, hand cleaning, or a softer method entirely.
Protection matters as much as cleaning
A good exterior prep crew doesn't just focus on the paintable surface. They pay attention to the whole property.

That includes protecting landscaping, managing runoff, working carefully around trim, and not treating windows like collateral damage. It also means handling screens correctly. Pine Country Window Cleaning was started by Flagstaff native David Kaminski in 1999, and that kind of long-term local service matters because homes here need more than generic exterior cleaning. Screens should be removed, cleaned, and reinstalled properly. Window seals and frames should be respected. The house should be cleaner when the crew leaves, not just wetter.
If you're comparing providers, this page on pressure washing services near you gives a practical look at what a dedicated exterior cleaning service covers.
The safer route for most homeowners
There's also the obvious issue. Pressure washers can injure people and damage homes fast. Add ladders, second-story work, detergents, and slick footing, and the risk goes up quickly. Most homeowners don't do this often enough to develop good instincts with spray angle, stand-off distance, or how different siding reacts.
Hiring a professional usually means:
- Less risk to people: No learning on a ladder with pressurized equipment.
- Less risk to the house: Better odds of avoiding forced water intrusion and damaged finishes.
- Better sequencing: The cleaning, drying, and inspection phases are handled in the right order.
- More complete care: Windows, screens, trim, and surrounding surfaces aren't ignored.
For homeowners getting ready to paint, that's usually the difference between prep that supports the new coating and prep that undermines it.
If you want help with pressure washing house before painting in Flagstaff or the surrounding area, Pine Country Window Cleaning can help you prep the exterior carefully, protect your windows and screens, and clean the home with the right method for its condition.