

Dust on the mesh usually shows up before the glass looks dirty, and in Northern Arizona that happens fast. You open a window for fresh air, then notice the screen is holding a gray film of pollen, road grit, and fine dust that keeps drifting in every time the wind picks up. The fix is not to blast it. The fix is to work the screen the way a pro crew does, dry first, then wash gently, then dry completely before it goes back in the frame.
Why a Staged Cleaning Approach Protects Your Screens
A dusty screen tempts people to grab the hose and go straight at it, but that first blast can force grit deeper into the mesh. In Flagstaff, Munds Park, and other high-dust areas, the better move is simple, remove loose debris first, then let water do the rest. That sequence lines up with common guidance from multiple cleaning sources, which consistently describe a dry-first method, followed by a mild wash and full drying before reinstallation (window screen maintenance guidance).
Dry first, then add moisture
The mesh is delicate. If dust is still sitting on it when water hits, that grit can get pressed into the fibers or pushed toward the spline groove, where it's harder to remove and easier to damage. A vacuum brush or soft dry brush lifts that loose material away before it turns into muddy residue.
That's why the sequence matters more than the product. A staged workflow also leaves less film behind, and less residue means less new dust clinging to the screen later.
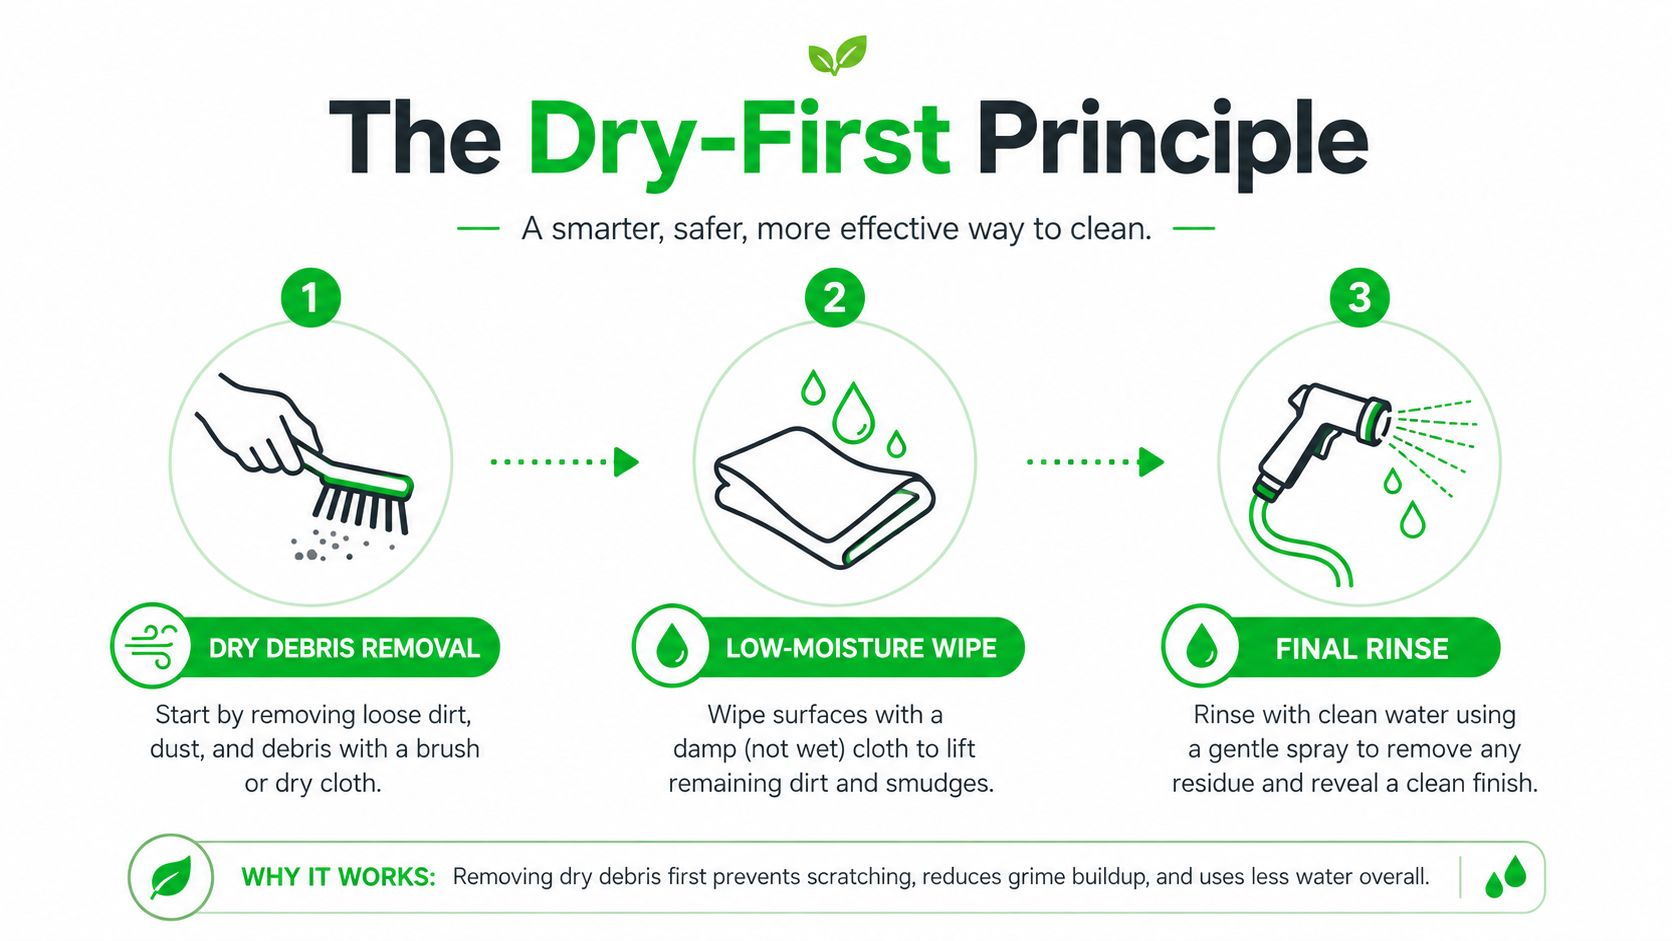
Practical rule: if the screen still feels dusty when you touch it dry, don't wet it yet.
Why this matters in dusty climates
In a place like Northern Arizona, screens collect fine particles that don't always look dramatic from a distance. The problem is what happens after the first rinse, because wet dust becomes paste, and paste is what stains the mesh, leaves streaks in corners, and clings around edges. A staged process keeps the cleaning controlled instead of messy.
Seasonal maintenance also fits this approach. Common guidance recommends full screen cleaning two to three times per year (window screen care guidance), which makes a spring, summer, and fall rhythm practical for homes and properties that deal with dust and pollen. The goal isn't perfection every week, it's keeping buildup low enough that the screen stays open, clear, and intact.
Deciding Between Removal and In-Place Cleaning
Not every screen should come out, and not every screen needs to stay put. The right choice depends on access, frame condition, and what's sitting in the mesh. Upper-story windows, older frames, and tight access points often make in-place cleaning the safer option, while removable screens benefit from a fuller wash when the grime is heavier.
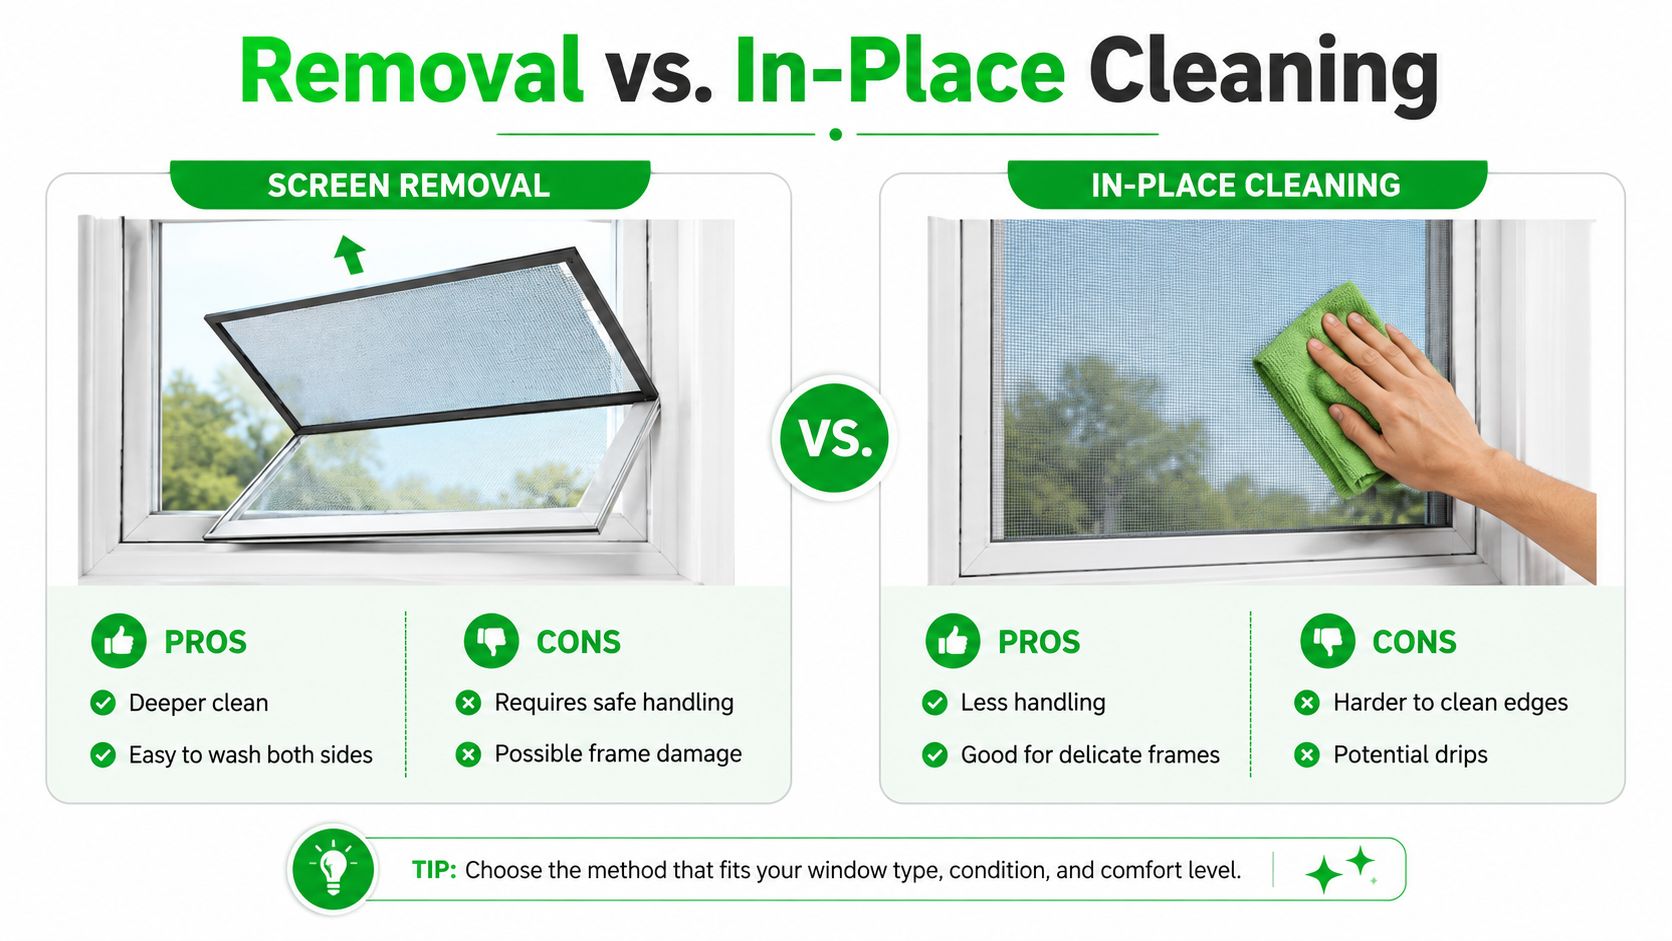
For homeowners in places like Forest Highlands or Pine Canyon, the decision often comes down to access and risk. If a screen comes out easily and the frame is sound, removal usually gives a more complete clean because both sides can be washed evenly. If the window is hard to reach or the frame already feels fragile, lower-moisture in-place work is the smarter path. That tradeoff is part of the gap in typical advice, because removal cleans more thoroughly, but in-place methods may be the only realistic option for difficult windows (inside-cleaning approach).
When removal makes more sense
Removal pays off when the screen is carrying pollen, greasy residue, or post-construction dust. Those are the kinds of buildup that settle into corners and frame edges, where a hose or cloth in place won't always reach cleanly. It also helps when a screen needs a deeper inspection for bent corners, loose spline, or frame wear.
The process does require more care. You need safe handling space, a place to lay the screen flat, and room to dry it fully before it goes back.
When in-place cleaning is enough
In-place cleaning works when the goal is routine upkeep rather than restoration. A vacuum brush, soft cloth, or other low-moisture tool can clear surface dust without risking damage on an awkward window. That's especially useful for second-story homes, older cabins, and commercial properties where removing every screen would take too much time or require access equipment.
If you're scheduling a full-window service, it helps to ask whether screen removal and reinstall are included. Screen installation service matters because the screen job isn't really finished until the frame is back where it belongs and seated properly.
A screen that stays in place isn't “less clean” by default. It's just being cleaned with a different level of access and risk.
The Professional Screen Cleaning Workflow
A screen that comes out clean in dusty country usually gets there by stages, not by force. In places like Flagstaff, where fine grit settles into mesh and frames, the safest workflow starts dry, moves to a mild wash, and finishes with a controlled rinse and full drying. That sequence keeps you from grinding debris deeper into the weave.
The kit matters, but only if it supports that low-pressure approach. A practical list of screens for indoor air quality helps homeowners think about filtration and maintenance together, while the screen itself still calls for a vacuum with a brush attachment, a soft-bristle brush, a bucket, and a hose set to low pressure. If you want a field-tested shopping list for the work, best professional window cleaning tools gives a better sense of what crews reach for and what usually stays in the truck.
Start with dry extraction
Vacuum both sides with a brush attachment, or use a soft dry brush to lift loose dust, cobwebs, and pollen. Work top to bottom so the debris falls away from the mesh instead of settling back into it. Skip this step and the water stage turns loose grit into muddy residue that is harder to rinse out cleanly.
Mix a mild solution, not a strong one
Use a small amount of mild dish soap in warm water. For heavier grime, a 1:1 vinegar-and-water mix can help, and Filtrete's five-step screen cleaning instructions gives a practical example of a modest soap ratio as well. The goal is enough cleaning power for routine dirt without leaving a film behind.
Apply the solution with light circular pressure on both sides. The brush should lift dirt, not grind it.
Rinse low and let gravity help
A low-pressure rinse is the safe finish. Strong spray can stretch the mesh or push it out of the spline groove, which leaves bulges and a loose fit, as noted in Phifer screen care guidance. Keep the rinse gentle and work from top to bottom so dirty water does not run over areas you already cleaned.
Then dry the screen completely in open air before it goes back in the frame. Upright drying with airflow is a sound habit, and some crews use that time to check for bent corners, loose spline, or frame wear while the screen is still out. A screen that goes back damp can trap residue, attract dust, and create the kind of mess you were trying to avoid in the first place. Guidance from ATCO Energy screen cleaning guide also points to upright drying before reinstallation when conditions allow, but the standard is simple: the mesh should feel fully dry before it gets reinstalled.
If soap dries on the mesh, it attracts dust later. Rinse until the screen feels clean, not just looks clean.
Treating Stubborn Stains and Mold Buildup
Routine dust is one thing. Stubborn film from monsoon grit, pine pollen, or shaded moisture is another. When a screen has darker spots or a sticky feel, the answer is still gentle chemistry, not aggressive scrubbing. Start with mild detergent for general grime, then move to targeted spot treatment only where the residue will not lift easily.
For heavier buildup, the safer cleaners stay in the mild range. A small amount of dish soap in water handles most dirt, and vinegar can help with mineral spotting without beating up the mesh. If you are dealing with a white, chalky deposit that keeps clinging to the screen, removing hard water deposits from screens calls for the same patient approach. Work the cleaner onto the problem area and let it sit briefly before you agitate, so the brush lifts the deposit instead of pushing it deeper into the fibers.
Work the corners first
Corners and frame edges are where dust settles and dries hardest. I always start there before I move across the main field of the screen, because those pockets hold more grime than most homeowners expect. Use a soft brush or sponge and work in small circles with light pressure.
The goal is to loosen the stain, not chase it across the mesh. If a spot does not release right away, pass over it again after the cleaner has had a little time to break it down. Sharp tools, scouring pads, and aggressive rubbing are the fastest ways to damage delicate screening, especially when the stain is bonded to the fibers and someone gets impatient.
Mold needs patience, not force
Mold and mildew usually show up as dark patches on screens that stay damp or shaded. A vinegar wash can help loosen that buildup, but the key fix is to remove the moisture source and dry the screen fully after cleaning. On a cabin window that stays shaded and damp, cleaning may clear the stain while the conditions that caused it stay the same.
That is also where removal and full inspection matter. If the mesh is sagging, brittle, or leaving residue behind after careful washing, replacement may make more sense than another round of cleaning. The same goes for screens that no longer sit flat or have fibers that look worn through.
A note on local service
Some properties are better served by a crew that handles screens as part of a full window wash. Pine Country Window Cleaning removes each screen, deep-cleans it, and reinstalls it as part of the service, which matters when the buildup is beyond a quick touch-up. That approach fits jobs where the screen needs the same level of care as the glass and frame, especially when dusty conditions keep pushing fine grit back into the mesh.
Drying and Reinstalling Screens Correctly
A wet screen goes back in too soon, and you create a new problem. Moisture trapped against the frame pulls in dust quickly, can leave streaks where it should not, and may change how the screen seats in the opening. The fix is simple, but it takes restraint.
Set the screen upright in a dry, well-ventilated spot where air can reach both sides. Sun helps in dry weather, but airflow matters more than heat. Manufacturer cleaning instructions and trade guides both point to the same basic rule, let the mesh dry fully before reinstalling, rather than guessing by surface appearance.
Check the feel, not just the look
A screen can look dry and still hold water in the mesh. Run your hand lightly over the surface and check the frame edges, corners, and lower rail, because that is where moisture tends to linger. If the screen feels cool or damp anywhere, it needs more time.
That matters for second-home owners and anyone who is not on-site to watch the drying conditions. A rushed reinstall traps moisture, and that trapped moisture becomes the next cleaning job sooner than it should.
Reinstall with the hardware secured
Once the screen is completely dry, put it back into the opening and make sure the hardware is locked or secured after replacement. That small step keeps the screen seated properly and reduces the chance of movement later. If the screen came out of a tight or high window, the reinstall deserves extra care.
A full-service crew removes, cleans, dries, and reinstalls in one workflow, so the homeowner does not have to guess when the screen is ready. That is one reason removal-and-reinstall service makes sense on larger homes, cabins, and commercial properties.
Drying is not dead time. It protects the frame, the mesh, and the next cleaning cycle.
Seasonal Maintenance and When to Call a Professional
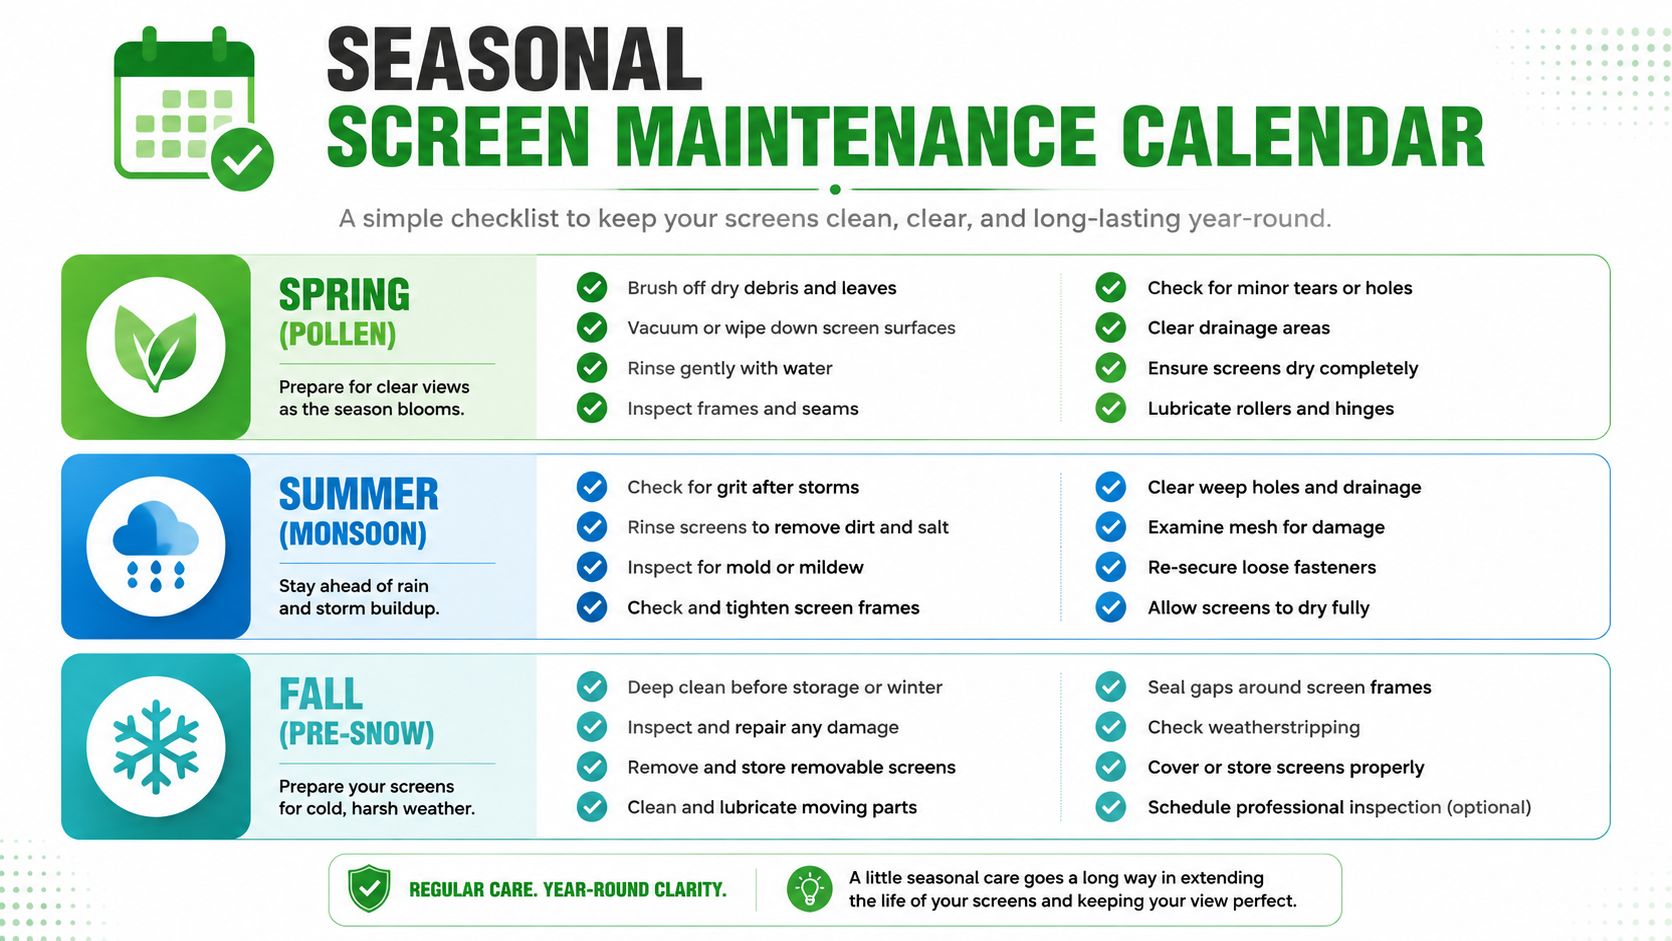
In Northern Arizona, screen care follows the weather, not the calendar on a wall. Spring brings pollen, summer brings dust and monsoon debris, and fall is the time to get ahead of closed-window season. The basic benchmark of two to three full cleanings per year fits that rhythm well (window screen care guidance).
A practical seasonal rhythm
Spring is the time to brush off dry pollen before you start opening windows regularly. Summer calls for a check after storms, because grit and fine debris settle on screens fast during monsoon weather. Fall is the smart time for a deeper clean before colder weather, storage, or a long stretch of closed windows.
That schedule works for full-time homes in Flagstaff and seasonal places in Munds Park alike. If the property sees heavy dust, more frequent attention makes sense, especially if the screens sit near roads, trees, or active construction.
Know when the job is too much for DIY
Call a professional when the screen is on a multi-story window, the frame is bent, the spline is damaged, or the screen no longer sits flat. Those are the jobs where a ladder, the right tools, and careful reinstall matter more than a quick rinse. It also makes sense to bring in a crew when the time you'd spend removing, cleaning, and reinstalling screens would pull you away from the rest of the property.
Pine Country Window Cleaning has served Flagstaff since 1999, and the team handles screens with every window service, from removal to deep cleaning to reinstallation. For homes, cabins, hotels, campuses, and commercial buildings, that full process keeps the work consistent and reduces the chance of damage from rushed handling.
If your screens need more than a quick brush-off, schedule a visit with Pine Country Window Cleaning. Their crew can remove, clean, and reinstall screens as part of the window service, which is the cleanest way to protect the mesh, the frame, and your time.