

The garage door comes up at 6 a.m. and there's a foot of snow where the car should be, with another six inches forecast before lunch. In Flagstaff that morning doesn't arrive once a winter. It arrives a dozen times, and the driveway you clear badly in November is the one you're still fighting in March.
Clearing snow is a sequence of decisions, not a single chore. When you start, which direction you push, where the pile lands, and how little deicer you can get away with all matter more than how hard you swing the shovel. Get those right and a storm costs you 25 minutes. Get them wrong and you're chipping at ice that bonded to the pavement overnight.
Plan Your Clearing and Choose the Right Method
The first storm that sticks usually lands in late October, and it catches people with a cracked shovel, an empty gas can, and a snowblower that won't start because it sat since spring. That's the wrong week to discover your equipment situation.
The local numbers aren't gentle. The NOAA climate assessment for Flagstaff records average annual snowfall of approximately 109.4 inches for the 1971–2000 period, with an average first measurable snowfall around October 24, an average last snowfall around May 9, and a snow season lasting about 198 days. Extremes tell you more than the averages: the 1972–1973 season delivered 210.0 inches, while 1933–1934 produced just 11.2 inches. Plan for the bad year and scale back when an easy one shows up.
Four chores to finish before the first storm
- Stake the edges. Drive a marker at every corner, curb, gravel border, paver edge, and mailbox post. In a storm, after dark, under six inches, the driveway and the landscaping look identical, and a plow blade finds the difference.
- Test the equipment now. The shovel handle shouldn't be cracked, the blower should start on the second pull, the auger and chute should move freely, and the fuel should be fresh. A machine that won't run at 15°F is a machine you end up shoveling around.
- Choose the snow storage zone. The pile belongs downwind and downhill of the driveway, clear of the garage door and foundation, and off any slope that drains back across the pavement. You want meltwater leaving the driveway, not crossing it.
- Decide the method for each storm size. A dusting, a moderate dump, and a wet foot of cement are three different jobs. Pick the tool for each before you're standing in it at 6 a.m.
Match the method to the driveway, not the flyer
Four things settle the choice: driveway length and width, snow depth and wetness, how often storms arrive, and your own physical capacity plus where you store equipment. A 20-foot city driveway and a 200-foot mountain approach are different jobs that share a name.
Cost is where people misjudge it in both directions. The 2024 figures reported by Boston.com on snow blower pricing, citing snow-equipment expert Peter Herman, put one-stage blowers at $150–$250 and three-stage models at about $1,900 on average. Those are the numbers in the table below, and seasonal snow removal pricing covers the other side of the ledger if you'd rather not own the machine.
| Method | Best for | Typical cost | Main limit |
|---|---|---|---|
| Manual shovel | Light snow on short driveways | Lowest upfront cost of any method | Physically demanding in deep or wet snow |
| Snow pusher | Flat, wide driveways with light to moderate snow | Low cost, no fuel or maintenance | Struggles with deep, compacted or wet snow |
| Single-stage snow blower | Moderate snow on small to medium driveways | $150–$250 (2024 typical) | Weak on heavy, wet accumulations and leaves a thin layer |
| Three-stage snow blower | Deep, wet or repeated heavy storms | About $1,900 average (2024) | High upfront cost and storage space needed |
| Professional snow removal | Large driveways, repeated storms, limited mobility | Quote-based, per visit or seasonal | Recurring cost and scheduling depends on the provider |
Owners know what they care about in a machine. A 2024 U.S. News survey of 100 people who own or have used a snow blower found that 68% ranked snow-handling capacity and power source as their top considerations. Read that as a warning against buying on price alone. A cheap single-stage that clogs on wet snow costs more in lost mornings than the difference at the register.
Three rules that settle it
- Short driveway, light snow: a wide pusher and 20 minutes. A blower bought for four inches of powder sits in the garage for 11 months.
- Wide driveway, moderate snow: a single-stage blower or a wheeled pusher. Both move volume without lifting, which is the part that saves your back.
- Deep, wet or repeated storms: a three-stage blower or a service. Wet snow is the condition that breaks equipment and people.
Keep one tool in reserve no matter what you choose: a hand shovel for edges, corners, the mailbox, and the strip at the garage door the machine can't reach.
Practical rule: if clearing takes longer than the storm takes to arrive, it's a service job, not a technique problem.
How to Clear Your Driveway Step by Step
The order you move snow matters as much as the tool in your hands. Push it the wrong direction and you spend an extra 20 minutes herding slush uphill. Do it in the right sequence and the driveway drains itself while you work.
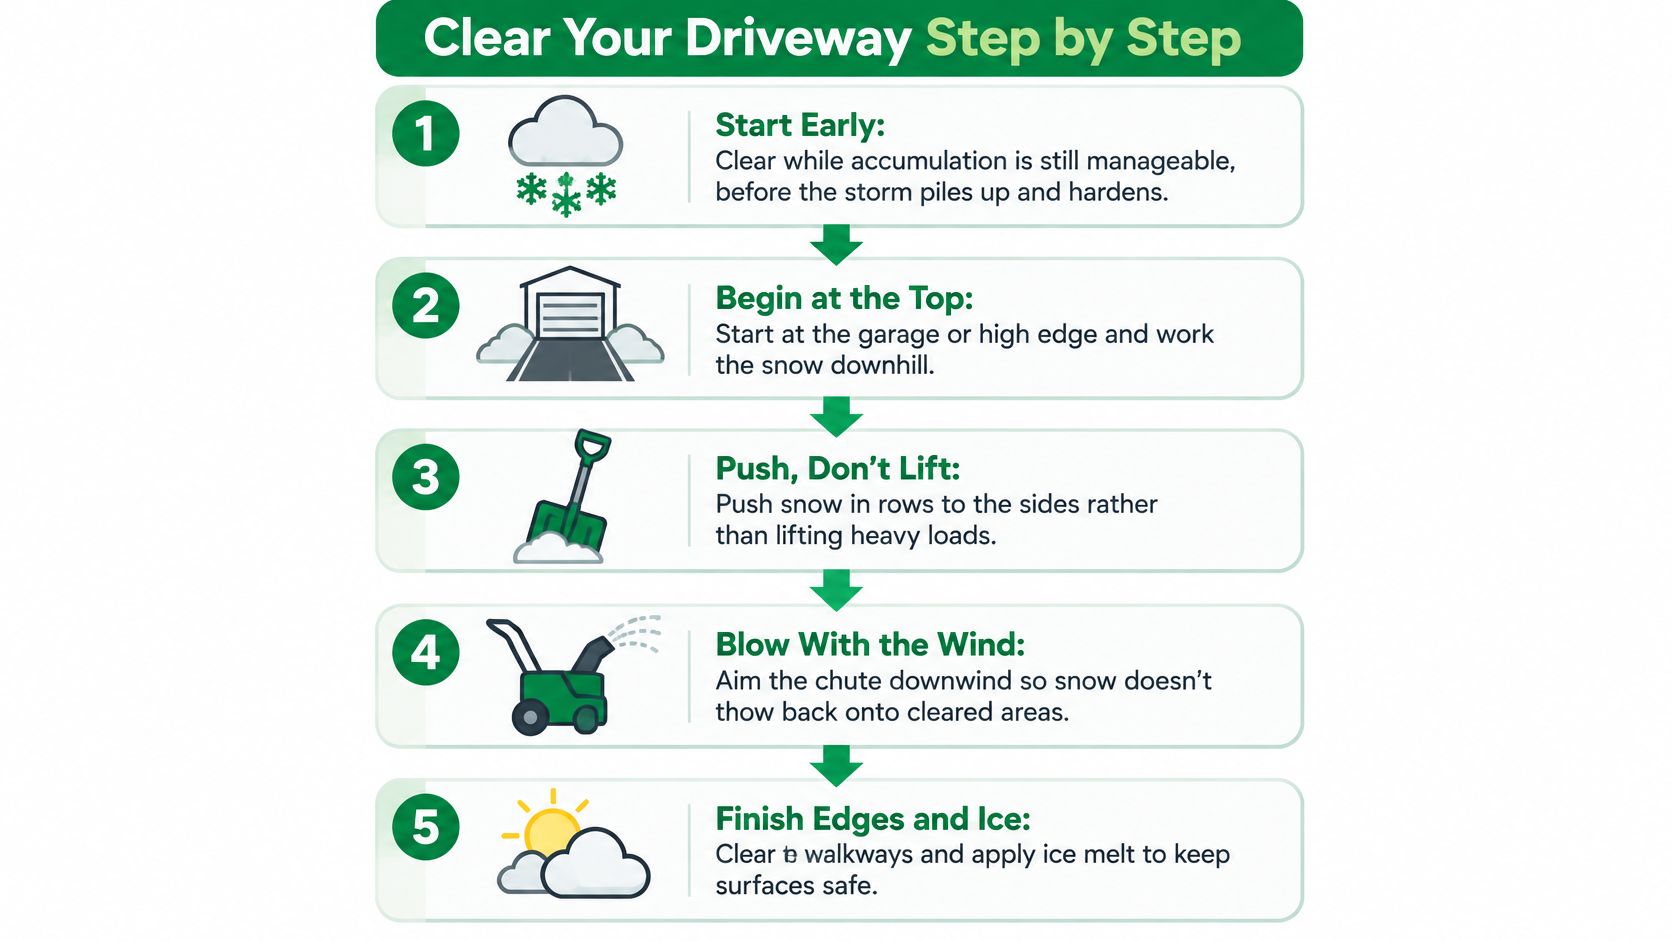
- Start before the storm finishes. Clear at six inches rather than waiting for 14. Snow that sits through a freeze-thaw cycle bonds to the pavement, and bonded snow turns a shovel pass into a scraping job.
- Begin at the garage or the highest point. Work downhill and outward toward the street so loose snow and meltwater travel away from the doors and the parking pad.
- Push, don't lift. A wide blade skimming the surface clears faster and loads your back less than scooping. Fill the blade and you'll be lifting 30 pounds of slush every few feet.
- Aim the chute downwind. Blowing snow back across the lane you just cleared means doing the same strip twice, and blowing it at a parked car means doing it three times.
- Clear edges and corners last. Posts, steps, and the transition strip at the apron need a hand shovel. Save them for the end so the main run gets done while you're fresh.
- Scrape the residual layer. A flat-edged shovel or scraper takes off the compacted film the blade left behind. That film is what becomes black ice by evening, and removing it now means less deicer later.
Say your driveway is 40 feet from the garage to the street. Clearing from the garage outward keeps the slush moving downhill and away from the door seal, and you finish at the street. Start at the street and work backward on that same driveway and you push meltwater into the one place it can't drain, right against the garage slab, where it refreezes into a sheet by midnight.
Reversing the direction turns a working driveway into a drainage problem. The water has to go somewhere, and working from the street backward sends it to the one spot it can't leave.
Where the pile goes deserves a second look before you start pushing. Keep it off the neighbor's side of the property line, off the storm drain, and off any slope that runs back toward the house. A pile that melts across the driveway at 2 p.m. and refreezes at 7 p.m. undoes the entire morning's work.
Stop Ice Before It Bonds to Pavement
Loose snow never gets salt. Deicer needs contact with pavement to do anything, and spreading it over an inch of powder wastes the product and leaves you with a wet, refrozen layer instead of a clean surface.
University of Minnesota Extension advises shoveling, scraping and sweeping frequently, because removing snow early reduces both ice buildup and the amount of salt you need. Its working benchmark is about 12 ounces of salt, roughly one coffee mug, for 1,000 square feet, with granules spaced around 3 inches apart rather than dumped in piles. Thicker coverage doesn't melt faster. It damages the vegetation beside the driveway, contaminates runoff, and costs more.
Temperature is the limit most homeowners never check. Sodium chloride stops working on pavement colder than about −9°C (16°F), according to testimony on reduced salt practices in the Lake Champlain basin. Below that, switch to sand or grit for traction and skip the chemical entirely.
| Condition | Recommended approach | Reason |
|---|---|---|
| Loose snow on driveway | Clear with shovel or blower first, do not salt | Deicer needs contact with pavement and loose snow dilutes it |
| Bonded ice, pavement warmer than −9°C (16°F) | Apply sodium chloride sparingly, about 12 oz per 1,000 sq ft | Salt works at these temperatures and minimum amounts limit damage |
| Pavement colder than −9°C (16°F) | Use sand or grit for traction and skip salt | Sodium chloride is ineffective below this threshold |
| Thick compacted layer that cannot be moved | Scrape first, then apply deicer so it can melt the remainder | Mechanical removal before chemical treatment limits salt use |
Slabs of ice on access routes are their own problem. The National Weather Service winter safety guidance notes that less than one-quarter inch of ice on stairs is dangerous, and advises salting when a thick snow layer can't be moved easily so the material can melt through it.
After the thaw, walk the full driveway and look for shaded patches, snowbank runoff, and low spots where water crosses the walking path and refreezes overnight. Treat those first, before the next freeze arrives. Sweep up unused granules from dry pavement and keep them for the next storm; they're still good.
Safety Limits to Respect While Shoveling and Blowing
Shoveling is not a warm-up. Cold air constricts blood vessels while heavy lifting spikes demand on the heart, and that combination is why the first big storm of the season fills emergency rooms.

The National Weather Service winter weather guidance is explicit here: move only small amounts of snow with each pass, take frequent breaks, stay hydrated, and stop when you're exhausted. It singles out heavy, wet snow as a cause of back injuries and heart attacks. Sweating under layers of clothing then raises the risk of chilling once you stop moving.
The injury counts back that up. The U.S. Consumer Product Safety Commission reported approximately 4,700 snowblower-related injuries treated in emergency departments in 2022, with the wrist, hand and fingers accounting for 36% of injuries tied to winter activities. A 2025 Frederick Health safety report puts snow shoveling at about 11,500 injuries annually.
The rule that prevents most blower injuries
Never put your hands near an obstructed auger or discharge chute. Shut the machine off completely, wait for the auger to stop turning, and clear the blockage with the manufacturer's tool. Most hand injuries happen to people who were sure the machine had stopped.
Gear that isn't optional
- Stable footwear: boots with real tread, not the sneakers you wore to check the mailbox.
- Eye and hearing protection: especially with a blower throwing grit and running at full RPM for an hour.
- Clear space: children and bystanders stay well back from a moving auger, and nobody stands in the discharge path.
If you want the fuller checklist on load limits and storm-day habits, our snow removal safety tips walk through what to watch for before you start.
Decide When to Call a Professional Snow Removal Service
Tuesday morning, the second storm of the week is still falling, the berm at the street is waist-high, and you are already late. Clearing early and pushing snow instead of lifting it works on a light, fresh fall. A driveway that has outgrown the tools and the person doing the work needs a different plan.
A single-stage blower in a two-foot storm is a shovel with extra steps. Wet, compacted snow is the load that injures backs and stalls augers. Two events in one day, or four in a week, and the piles run out of room before your energy does. Once clearing takes more than an hour, the driveway owns the morning. The same cutoff applies when a guest, a tenant, a caregiver, or a delivery driver is waiting at the bottom of the hill, and when heart disease, back problems, or age makes heavy lifting a real risk. More salt will not move a pile you cannot shift, and a second tired pass is how a chore turns into an injury.
I recommend a split for a household driveway: shovel or blow the routine light storms, and hand off the big ones. That keeps the bill down without gambling on the storm that lands when you are already late.
Pine Country Window Cleaning covers residential driveways and sidewalks with shovels and snow plows in Flagstaff and Munds Park. Larger jobs, such as parking lots and commercial buildings, are referred to Flagstaff Snow Removal. You can book snow removal service online or call (928) 527-0671 for a free estimate. Pick your limit before the next system arrives, and get on the schedule early in the season rather than the morning you are stuck.
Pine Country Window Cleaning has served Northern Arizona since 1999 as a locally owned and operated company. The storm that would have cost you a morning costs a phone call instead. Visit Pine Country Window Cleaning to see everything the crew handles, from snow removal to the windows behind it.